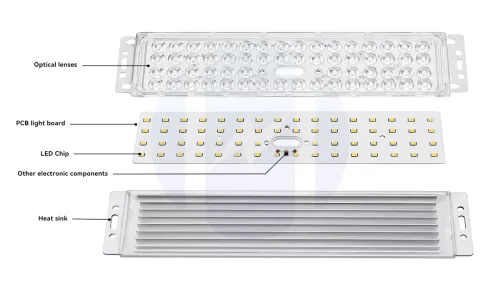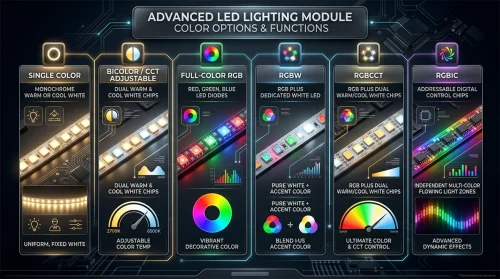
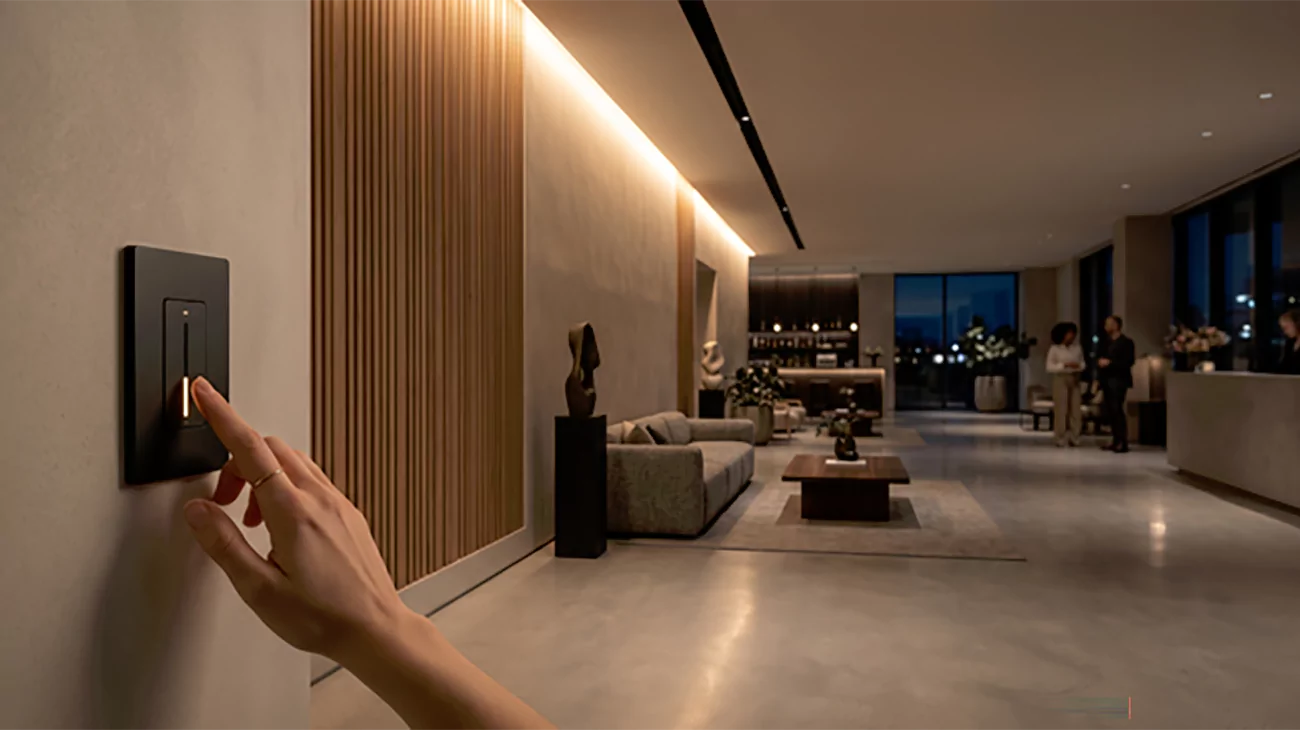
LED dimming works by changing the average current the driver feeds the LEDs, and there are three common principles for doing it: pulse-width (PWM) control, constant-current regulation, and grouping control. Where the driver sits — built into the light or supplied as a separate unit — then decides how the dim command actually reaches it. So the principle has two halves: how the current is controlled, and how the control signal gets to the driver.
- Pulse-width (PWM) control.
The most common principle, usually shortened to PWM. The driver turns the supply into a square wave and varies the duty cycle — the share of each cycle the current is switched on — so the average current, and the brightness, track that ratio. Because the LED still receives its full rated current during every “on” pulse, color temperature stays stable across the range, which is why PWM dominates quality dimming. - Constant-current regulation.
Also called analog or constant-current reduction, this principle leans on linear electronics to vary the size of the steady current instead of pulsing it. Lowering the current dims the light directly and silently, and the level can be set smoothly, even with a simple variable control. The trade-off is a possible slight color shift at the low end, since the LED no longer runs at its rated current. - Grouping control.
A coarser principle suited to large LED arrays: the LEDs are split into groups, and a grouping device regulates whole groups rather than every chip on its own. It needs the circuit mapped and the groups planned in advance, but it is a simple, robust way to set levels across many fixtures at once.
Built-in (integrated) driver.
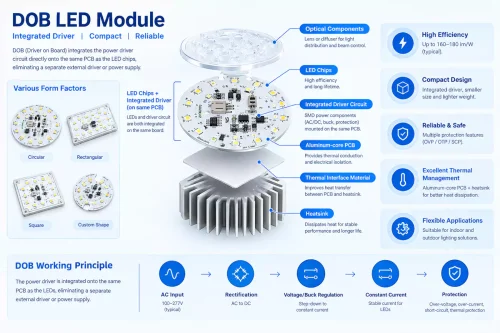
In an integrated design the driver is sealed inside the lamp or fixture, with no accessible control wires. The only way to dim it is an external wall dimmer on the AC line — usually phase-cut (TRIAC or ELV) — and the lamp itself has to be sold as “dimmable” for that to work. This is the arrangement in most retrofit bulbs and in driverless AC modules: convenient and compact, with nothing extra to wire, but limited to the dimming the lamp was built for, harder to service because a failed driver means replacing the whole unit, and warmer because the driver’s heat sits inside the fixture.
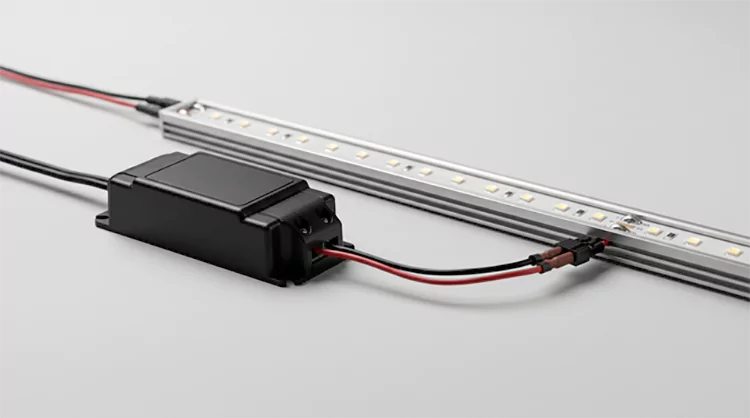
Separate (external) driver.
In a separate-driver design the dimmable LED driver is its own accessible unit between the mains and the LEDs, and it does two jobs at once: it powers the module and it reads a dimming signal to adjust output. That signal can be phase-cut on the AC line, a low-voltage analog line such as 0-10V, or a digital protocol such as DALI — so the dimming method and protocol are chosen at the driver, not fixed by the lamp. This is the standard in commercial, architectural, strip, and linear lighting: more control, deeper and smoother dimming, easier service because the driver swaps on its own, and better thermal behavior because the driver can sit where it runs cool. It is also where Higntek does most of its dimming work, matching the driver and control method to each project rather than shipping one fixed configuration.
| Aspect | Built-in (integrated) driver | Separate (external) driver |
|---|---|---|
| Where the driver sits | Sealed inside the lamp or module | Standalone, accessible unit |
| How it is dimmed | External wall dimmer on the AC line (phase-cut) | Driver reads a signal — phase-cut, 0-10V, or DALI |
| Dimming flexibility | Limited to what the lamp supports | Method and protocol chosen at the driver |
| Dimming depth | Typically ~10-100% | Down to 1%, 0.1% on premium drivers |
| Serviceability | Replace the whole unit if the driver fails | Swap the driver alone |
| Thermal | Driver heat builds inside the fixture | Driver can sit in a cooler location |
| Typical use | Retrofit bulbs, driverless AC modules | Commercial, architectural, strip, linear |
In short, the principle is the same current control in both cases, what changes is access. A built-in driver trades control for convenience, while a separate driver keeps the dimming method and protocol open — which is why most serious dimmable projects are built around an accessible dimming driver.
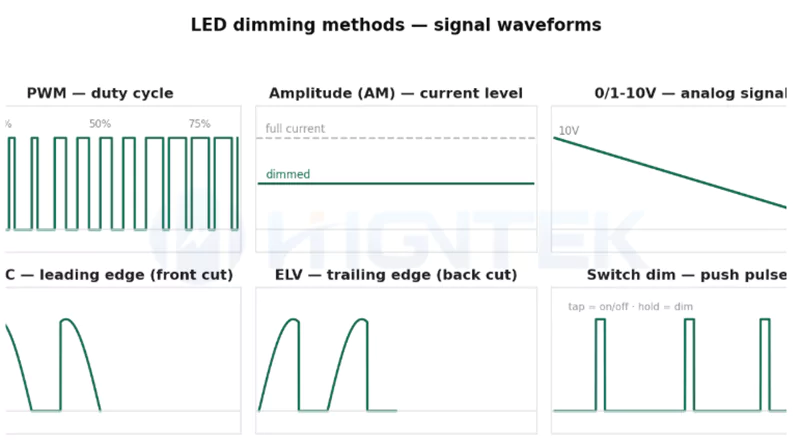
Where a protocol decides how a command travels, a dimming method is how the driver actually turns that command into less light. Some methods modulate the current inside the driver (PWM and amplitude). Others are the control input the driver reads from outside — a chopped mains waveform (TRIAC, ELV), a low-voltage analog line (0-10V), a momentary switch, or a wireless signal. The seven below cover almost every dimmable LED module on the market, and they are the LED dimming methods specifiers actually choose between.
PWM (pulse-width modulation).
PWM is the workhorse inside most dimmable drivers, and its standout quality is that the color never shifts as the light dims. It works by switching the LEDs fully on and off very fast, hundreds to thousands of times a second, far quicker than the eye can follow. Brightness is set by the duty cycle, the share of each cycle the power is on, so a 25% duty cycle gives roughly 25% brightness. The reason color stays true is simple. During every “on” pulse the LED runs at its full rated current, so the white point and CRI hold steady from full output all the way down, where analog dimming would let the tint drift. On top of that it dims over a very wide range down to 0.1%, wastes little power as heat, leaves LED life unaffected, and plugs straight into digital and smart controls. That mix is why PWM is the default for color-critical and high-quality work. The one thing to watch is the switching frequency. Because the LED is fully on or off, low-frequency PWM can flicker, strobe on camera, and add some electrical noise, so quality drivers switch in the 2-20 kHz range to stay within IEEE 1789 flicker limits.
Amplitude (AM / constant-current reduction).
Amplitude modulation, also called analog or constant-current reduction (CCR), is the smooth, quiet alternative to PWM. Instead of pulsing the LEDs on and off, it simply lowers the steady current a constant-current driver delivers, so the light output tracks the current up and down. The big advantage is that there is no high-frequency switching at all. That means no flicker, no strobing on camera, and very little electrical noise, which makes CCR the safer pick for EMI-sensitive sites, for damp or outdoor fixtures, and for runs where the driver sits far from its load. It also keeps the circuit simple. The trade-off is color and depth. As the current drops the color temperature can drift warmer, and pure analog struggles to dim evenly below about 10%. That is why many premium drivers run a hybrid, using analog at the top of the range and PWM for the deep end, to get flicker-free smoothness and 0.1% depth together.
0/1-10V.
0-10V is the simplest low-voltage analog dimming method and is the mainstay of commercial lighting. Brightness of LEDs is adjusted by changing the DC voltage between 0 and 10 volts. Think of it like a car accelerator. 10V is full output, and the level scales smoothly down from there, with no steps and no flicker. Because the control circuit is separate from the power, one dimmer can drive a large bank of fixtures at once, where a phase-cut dimmer tops out near 100 watts a 0-10V line can run thousands. That makes it the easy choice for offices, warehouses, and retail, and it ties straight into occupancy and daylight sensors and building controls. The trade-off is that it controls a whole zone together rather than each fixture on its own, which is the job of a digital system like DALI. Most commercial drivers follow the current-sinking convention (IEC 60929 Annex E), where the driver supplies the 10V and the dimmer simply pulls it down. A smaller theatrical world uses current sourcing (ESTA E1.3) instead, and the two must not be mixed. One sinking control typically pulls down only 30 to 50 drivers. The bottom of the range differs too, since 0-10V can dim to off while 1-10V stops near 10% and needs a separate switch.
TRIAC (forward phase-cut / leading edge).
TRIAC dimming is a tangent brightness control method that controls light brightness by “cutting off” a portion of the AC sine wave signal supplied to the luminaire. Its advantages include low cost and plug-and-play functionality. It chops the front off each AC half-cycle with a TRIAC semiconductor, cutting the power sent to the light. The big draw is the install. A retrofit TRIAC dimmer drops into an existing wall box in minutes, runs on the standard mains wiring already there (usually live and load, sometimes a neutral), and needs no extra control wires. That makes it far cheaper than 0-10V or DALI, often a fraction of the retrofit cost, with a mature supply chain and low failure rates behind it. It is the natural choice in homes, hotels, and restaurants for cozy, adjustable ambiance on downlights, track, and decorative fixtures. The one rule is that it only works cleanly with a driver built for it. A TRIAC needs a minimum holding current to stay triggered, so a too-small or non-dimmable LED load drops out and flickers or buzzes and may only dim to around 20%, never to a true candle-low level. A quality triac-dimmable driver fixes that, holding stable output at the low end, meeting the minimum load, and shipping with a tested dimmer compatibility list. Also called forward phase-cut or leading-edge, it is the method inherited from the incandescent era, which is why so many existing wall boxes still make it the go-to retrofit.
ELV (reverse phase-cut / trailing edge).
ELV is the refined, LED-friendly cousin of TRIAC, and its appeal is smooth, silent dimming. It is also called trailing-edge or reverse-phase, because it cuts the back of each AC half-cycle instead of the front. Where a TRIAC switches on hard and can buzz, ELV eases the current down toward the zero-crossing, a soft-off action that is quieter and far smoother at low brightness. That gentler waveform suits the capacitive electronic loads inside modern LED drivers much better, so flicker and hum largely disappear and the light dims deeper and cleaner. Its minimum load is lower too, which lets it dim the low-wattage LEDs that a TRIAC often struggles with. This is why ELV is the preferred choice for homes, hotels, and design-led interiors where mood lighting has to look and sound right. Under the hood it uses a MOSFET or IGBT rather than a TRIAC to chop the trailing edge. The trade is that an ELV dimmer usually needs a neutral wire and costs more than a TRIAC, which is the price of being the higher-quality option for residential and light-commercial LED work.
Switch Dim (touch dim / push dim).
Switch dim, also branded touch dim or push dim, is the simplest digital way to dim, and it works from what looks like an ordinary wall switch. The control is a momentary retractive push button. A quick tap toggles the light on or off, and a press-and-hold ramps the level smoothly up or down, so the whole thing is fingertip-simple with nothing to program. Its appeal is being cheap and easy. It needs no dimmer module, no controller, and no addressing, just a standard push switch wired to the driver. Several push points can sit on one circuit, so the same light dims from both ends of a corridor or stairwell, something a single rotary dimmer cannot do. It also sidesteps the flicker that cheap rotary dimmers cause with LEDs. Under the hood it uses DSI-style signalling, with the mains itself carrying the command rather than a separate control bus, and a logarithmic curve keeps the fade easy on the eye. One circuit takes up to around 25 drivers. That makes it a natural fit for offices, stairwells, corridors, and single downlights in small to medium projects, as long as a proper retractive switch is used and the driver supports switch dim, not a standard latching switch.
Wireless.
Wireless dimming delivers the command through the air — over Zigbee, RF, Wi-Fi, or Bluetooth — instead of a control wire, while the driver still executes it with PWM or amplitude underneath. Removing control wiring is its main appeal for retrofits and smart spaces. The specific wireless networks were covered under protocols above; as a method, the point is simply that the signal arrives through the air rather than along a cable.
| Method | How it works | Wiring | Notes |
|---|---|---|---|
| PWM | Switches current on/off; duty cycle sets brightness | Inside the driver | No color shift; the default execution |
| Amplitude (AM) | Lowers the current level itself | Inside the driver | No flicker; can shift color at low end |
| 0/1-10V | Analog 0-10V control signal | 2 extra low-voltage wires | Commercial standard; 1-10V can’t switch off |
| TRIAC | Forward phase-cut (leading edge) | 2 mains wires | Cheap, retrofit; flicker risk at low end |
| ELV | Reverse phase-cut (trailing edge) | 2 mains wires | Smoother, deeper; better for LED loads |
| Switch dim | Momentary push on a mains signal wire | +1 mains signal wire | Simple local control, no addressing |
| Wireless | RF command (Zigbee / BLE / Wi-Fi) | None | No control wiring; retrofit and smart |
Two of these — PWM and amplitude — are what happens inside the driver, while the rest are how the dim command gets in; a single dimmable driver often accepts several. Higntek builds its modules and drivers to the methods a project actually uses, including driver-on-board AC designs for phase-cut dimming, so the dimming behaves the same on site as it was specified.
Both are phase-cut dimming: they dim by letting only part of each AC half-cycle reach the driver. The difference is which part they remove. Leading edge (forward phase-cut) delays turn-on and cuts the front of each half-cycle; trailing edge (reverse phase-cut) delays turn-off and cuts the back. That one difference decides how well each works with an LED module.
- Leading edge (forward phase-cut).
Leading-edge dimmers switch with a TRIAC or SCR, a device that latches on the moment it is triggered and keeps conducting until the current falls back toward zero. The dimmer stays off at the start of each half-cycle, then fires partway through, so the front of the wave is missing and a sharp voltage step is left behind. The amount of energy flowing to the LEDs depends on the duration of the “off” period. The longer the off period the dimmer the LEDs will appear to be. That step suited the resistive load of an incandescent bulb, but the abrupt edge and the TRIAC’s need for a minimum holding current are exactly what make cheap leading-edge dimmers shimmer, flicker, or buzz on electronic LED loads. - Trailing edge (reverse phase-cut).
Trailing-edge dimmers switch with a MOSFET or IGBT, which can turn off at any chosen point. They begin conducting cleanly at the zero crossing, follow the sine wave up, then interrupt the current before the half-cycle ends — removing the back of the wave. The result is a smoother voltage profile and much lower electrical noise, which is why trailing-edge (ELV) dimming suits the capacitive electronic drivers and ELV transformers in modern LED lighting, and why it dims more deeply and quietly than a leading-edge unit. The amount of energy flowing to the LEDs depends on the duration of the “off” period. The longer the off period the dimmer the LEDs will appear to be.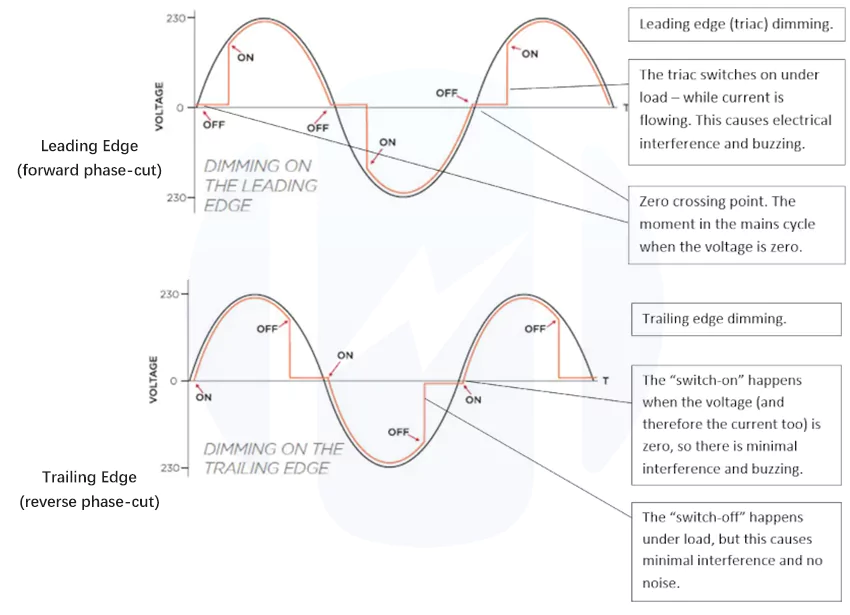
Leading Edge vs Trailing Edge Dimming
The practical rule is to match the dimmer to what the driver is built for. A driver marked leading-edge or TRIAC-dimmable needs a leading-edge dimmer; one marked trailing-edge or ELV needs a trailing-edge dimmer — and mixing the two types of dimmer is the usual cause of flicker, a narrow dimming range, or a fixture that will not dim at all. The trailing edge is generally the better fit for LED loads, but the only safe answer is the compatibility the driver’s datasheet actually states.
Because all of this behavior lives in the driver, a module is only as dimmable as the driver paired with it. That is why Higntek matches each module to a driver rated for the exact phase-cut type and dimmer family a project will use, so the dimming works on the wall the same way it works on paper.