Choosing the right LED module means checking the application, light quality, driver, thermal path, compliance needs, cost target, and supplier capability before the project moves from sample approval to production. Don’t think of LED modules as just small circuit boards with LEDs on them. In so many real lighting projects, it behaves more like a compact system where the LED package, PCB, driver, optics, housing, wiring, and test method all affect the final result.
The expensive mistakes usually appear after the first sample looks good enough. A retail shelf light may lose uniformity once the diffuser is added. A replacement LED module may fit electrically but fail because the mounting holes, connector direction, or CCT consistency do not match the old unit. A waterproof LED module for outdoor lighting may need more attention to sealing, coating, temperature rise, and cable exit design than to peak brightness alone. These details are not decorative, and they decide whether the finished LED module lighting product can stay stable in the real fixture.
That is also where standard and custom LED modules separate. A standard smd module led or ac led module works well when size, brightness, CRI, CCT, driver, and installation already fit the application. Custom LED module design becomes worth discussing when the project needs a specific size, tighter SDCM, higher luminous efficacy, lens matching, special electrical requirements, RGB control, infrared LED light module functions, or a structure that standard led module lights cannot support. For this kind of decision, I usually look less at the cheapest cost and more at whether the LED module manufacturer can connect engineering, prototyping, testing, and scalable production without losing control between each step.
How to Choose the Right LED Module?
Choosing the right LED module starts with six checks – application fit, light quality, driver matching, compliance path, long-term cost and supplier capability. I would not stop at broad words like high brightness or good quality. For a real lighting project, the first check should already include numbers such as target lumen output, lm/W, CCT, CRI, SDCM, voltage, current, IP rating, beam angle, operating temperature, and expected production quantity.
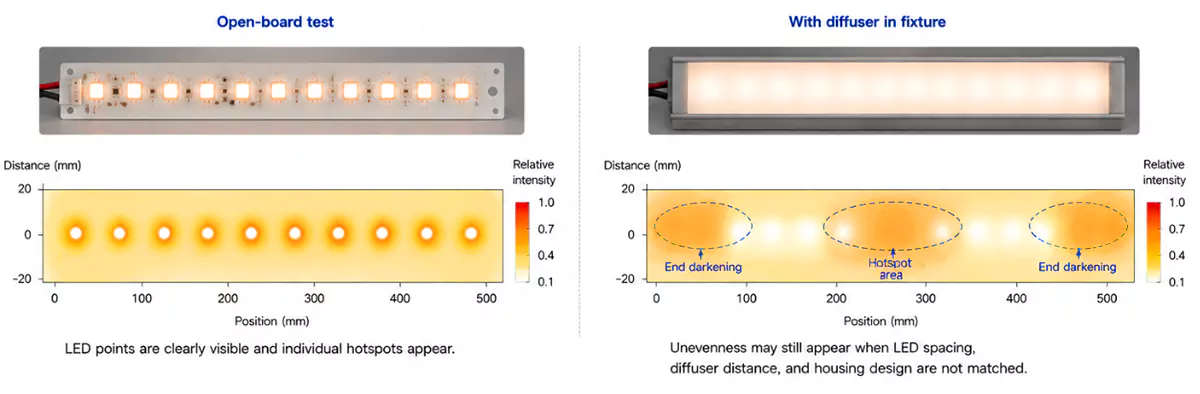
A sample can look acceptable on the bench and still change inside the final fixture. A 4000K module may look bright in open testing, then show uneven rows after a diffuser is added. A replacement LED module may match voltage, but still fail because the connector direction, screw holes, or PCB outline do not fit the old housing. That is why I usually read the LED light module as a compact lighting system. The LED package, PCB, driver, optics, housing, wiring, and test method all need to match the real product.
Start from the application, not the catalog.
The right LED module is the one that fits the working scene, fixture structure and visual target. I would first check whether the module runs 8 hours or 16 hours a day, whether it sits in an open fixture or a narrow aluminum profile, and whether the installation leaves enough contact area for heat transfer.
For indoor commercial lighting, visual quality often matters more than peak brightness. A led module light source for shelves, cabinets, offices, or linear fixtures may use 3000K, 3500K or 4000K, depending on the atmosphere and product category. CRI 80 is common for general lighting, while CRI 90 or higher is usually safer for fashion retail, cosmetics, grocery displays, galleries, and other places where color appearance affects buying decisions.
For outdoor and semi-outdoor lighting, protection becomes more important. A LED module waterproof project needs more than a waterproof label. We would check the IP rating, sealing method, cable exit, coating, connector, and operating temperature. IEC 60529 defines IP ratings as protection levels for enclosures against dust and liquids, so the rating should match the actual exposure instead of being used as a vague marketing word.
Replacement LED module work needs another kind of caution. Voltage, current, and wattage matter, but many replacements fail because of PCB outline, mounting holes, connector direction, lens height, diffuser distance, polarity, or CCT mismatch. Electrically correct does not always mean mechanically or visually correct.
Check light quality before chasing brightness.
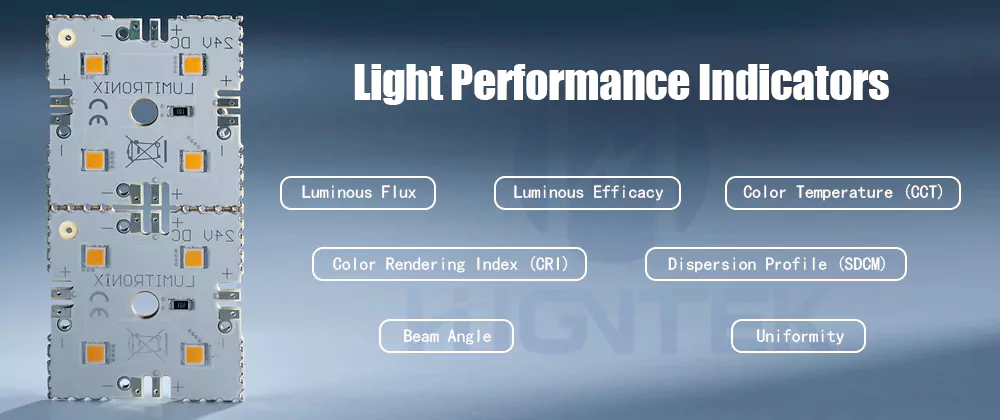
A suitable LED module for a current lighting project should meet the following light performance specifications: luminous flux, luminous efficacy, color temperature (CCT), color rendering index (CRI), dispersion profile (SDCM), beam angle, and uniformity. While brightness is important, it alone cannot determine whether a final LED module lighting product meets the requirements.

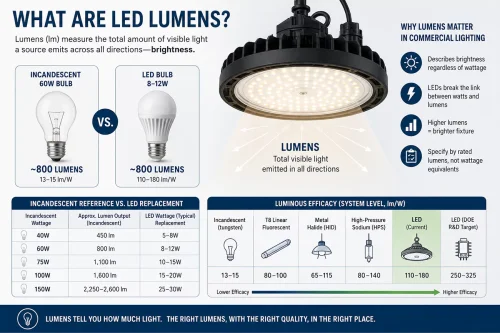
- Luminous flux tells how much visible light the module produces. Luminous efficacy, measured in lm/W, shows how efficiently the led lights module turns power into light. Currently, the luminous efficacy of LED lighting modules on the market is typically 130-160 lm/W, while our high-efficiency LED modules can achieve 180-265 lm/W, and can be fully customized to meet customer needs.
- And CCT decides whether the light feels warm, neutral, or cool. Common lighting choices often include 2700K, 3000K, 3500K, 4000K, 5000K and 6500K. Warm white works better for hospitality and relaxed spaces. Neutral white often fits offices and retail. Higher CCT can work for task lighting, industrial lighting, and some signage, but it may feel harsh in spaces where people stay for long periods.
- CRI describes how naturally colors appear under the light. In many general LED module lights, CRI 80 is a practical baseline. For retail displays, food lighting, fabric inspection, cosmetics counters, and high-end interiors, CRI 90 or above usually gives a safer visual result. I would not treat CRI as a decorative upgrade. It affects how skin tone, packaging, paint, fabric, fruit, meat, and materials look after installation.
- SDCM controls color consistency. A lower SDCM means tighter color variation. In visible multi-module layouts, 3 step SDCM is often a stronger target, while 5 step SDCM may still work in less color-sensitive projects. For long modular led light panels or linear fixtures, poor SDCM is easy to notice because the eye catches uneven color rows faster than small lumen differences.
- Beam angle and uniformity should be checked with the real optical structure. SMD LED lighting modules require the addition of lenses, diffusers, and reflectors to achieve uniform, directional lighting. Improper optical control can lead to streaks, dark areas, or edge shadows. Our engineering team tends to focus on luminaire performance when developing LED lighting modules, as optical components have a greater impact on the final result than described in datasheets.
Match the driver and electrical design early.
The driving solution for LED lighting modules is more than just lighting up the module. It affects current stability, flicker, dimming, heat generation, lifespan, and luminous efficiency. For high-efficiency LED modules, our engineers simultaneously match the LED package, operating current, voltage range, PCB heat dissipation path, and driver solution, rather than selecting the LED first and then treating the driver as a subsequent accessory.
This is crucial because the same LED package size does not necessarily mean the same electrical characteristics. For example, our proprietary 5050 LEDs have different series depending on the package material and structure; their color rendering index (CRI), operating voltage range, rated current, and luminous efficacy all differ. One version may offer a higher lm/W value at a lower current, while another may support a unique RG0 effect. If the module is driven beyond the operating conditions of the LED chip, the sample may initially appear bright, but in a real luminaire, it will result in reduced efficiency, higher operating temperatures, or faster luminous flux decay.
For constant-current designs, the current must match the LED string and thermal capacity. Higher current can raise lumen output, but it can also reduce efficacy and increase junction temperature. For constant-voltage modules, we would check voltage, current draw, wiring length, voltage drop, and power supply margin. For an AC LED module, RGB LED module, or dimmable module, the design also needs to confirm channel control, dimming method, driver compatibility, and safety margin.
This is where the Hightek’s engineering role fits the discussion. Its high-efficiency LED module work is not only about using efficient LEDs, but about matching LED selection, PCB layout, thermal design, driver matching, optics, and production validation so the approved output can be maintained inside the final product.
Treat compliance as part of design.
Compliance should be considered before the PCB layout, component selection and housing design are locked. Depending on target market and product type, the project may need RoHS, CE-related requirements, UL, ETL, IEC safety standards, EMC review, IP rating, material documentation, or buyer-specific testing.
- For some EU-related projects, RoHS is especially relevant because it restricts hazardous substances in electrical and electronic equipment, including lead, cadmium, mercury, hexavalent chromium, PBB, PBDE, DEHP, BBP, DBP, and DIBP.
- For wet, damp, or outdoor use, IP rating should match the real exposure level. Indoor cabinet lighting may not need waterproof protection. Outdoor signage, canopy lighting, refrigeration, damp commercial spaces, and industrial fixtures may need sealing, coating, waterproof connectors, or cable protection.
Compare cost through the whole project.
The lowest LED module quote is not always the lowest project cost. I usually separate cost into visible cost and hidden cost. Visible cost usually includes LEDs, PCB material, driver, lens, connector, assembly, testing, packaging and tooling. Hidden cost includes the redesign, sample delays, certification failure, poor color consistency, unstable supply, and field replacement.
Taking PCB substrate materials for LED lighting modules as an example: FR4 PCB may be enough for low-power or cost-sensitive modules. Aluminum PCB is often used when heat dissipation matters more. Copper substrate may enter the discussion when heat density is higher, although it usually raises cost. A simple diffuser may work for backlighting, while a precision lens or optical structure may be needed for a cleaner beam.
Choose a supplier that can connect engineering and production.
A reliable LED module manufacturer should be able to discuss the LED package selection, PCB material, driver matching, optical design, thermal path, BOM control, SMT assembly, testing, and production repeatability. If a supplier is only responsible for basic production and shipping, I suggest you exercise caution.
This is where Higntek fits naturally. Higntek positions itself as a technology-driven LED lighting module solutions manufacturer. Our official capabilities include 8 fully automated SMT lines, 25 Samsung machines, 4 reflow soldering ovens, BOM verification, SMT assembly, post-assembly processing, optical lens installation, conformal coating application, X-ray inspection, ICT, and 100% final product checks. These are relevant to custom LED module projects because approval is not only about one good sample. Our products must also reproduce approved light output, electrical performance, assembly quality, and material consistency during production.
How to Customize LED Modules?
Customizing LED modules means adjusting the size, LED package, brightness, luminous efficacy, CRI, CCT, SDCM, driver, electrical layout, optics, PCB material, wiring, connector, and structure around the final lighting product. For complete lighting projects, we don’t just start by customizing the LED modules; we start with the luminaires themselves. The real issue isn’t whether the LED module will light up, but whether it will function correctly within the customer’s luminaire housing, diffuser, power system, and production schedule.
A practical project scenario explains this better than a long definition. A refrigerated display manufacturer in Northern Europe was developing a 1.8 meter vertical cabinet light for supermarket chillers. The first standard led module lights passed the basic bench test. The 24V module looked bright enough, and the 4000K color temperature seemed close under open testing. Once the modules were installed into the narrow aluminum housing with a milky diffuser, the result changed. The diffuser absorbed more light than expected, the top and bottom sections looked darker than the center, and modules from different batches showed visible color difference across a long cabinet row.
The module was not defective. It simply had not been designed around that cabinet structure, diffuser distance, thermal path, and visual target. The final direction was a custom LED module with a revised PCB length, adjusted LED spacing, selected 4000K CRI 90 LEDs, tighter 3 step SDCM color control, a matched current setting, and optical testing inside the real diffuser. These changes sound very small on paper, but they solved the actual lighting problem. The customer did not need a brighter module only. They needed a led module light source that could fit the fixture, control heat, keep color consistent, and repeat the same result in production.
When is a standard module enough vs custom design?
A standard LED module is enough when it fits the project without forcing the fixture, driver, optical structure, approval process or future supply plan to change. Custom design becomes worth discussing when the standard module seems usable at sample stage but creates hidden cost in assembly, visual consistency, thermal margin, certification or repeat production.
We would not divide the choice by standard is cheap, custom is expensive. That is too simple for B2B lighting projects. The real dividing line is risk ownership. If a standard led light module fits the housing, works with the selected driver, meets the required CCT and CRI range, passes optical testing in the final diffuser, and stays available for repeat orders, it can be the better choice. There is no need to customize just to make the project look more technical.

The decision changes when the standard module asks the customer’s product to compromise. A module that is 3 mm too long may force a housing change. A connector facing the wrong direction may slow down assembly. A 5-step SDCM option may be acceptable for utility lighting but too loose for a long retail shelf where color rows are visible. And a module that passes brightness testing in open air may run too hot inside a slim aluminum profile. In those cases, the standard module is not really saving cost. It is moving cost into redesign, testing, production handling, or field complaints.
| Decision | Standard module is practical when | Custom module becomes stronger when |
|---|---|---|
| Mechanical fit | PCB size, hole position, connector direction, and cable exit already fit the fixture | The housing, diffuser, lens clearance, or assembly process must change to accept the module |
| Optical result | CCT, CRI, SDCM, beam angle, and uniformity pass inside the final fixture | The module needs CRI 90+, 3-step SDCM, special LED spacing, lens matching, or diffuser-specific tuning |
| Electrical design | Voltage, current, driver, dimming method, and wiring length already work safely | The project needs a dedicated driver, AC LED module structure, RGB control, special current setting, or lower flicker |
| Thermal margin | The module runs within the project’s heat limit in the actual housing | Output drops, surface temperature rises, or the fixture has limited space for heat transfer |
| Compliance and approval | Existing documentation and material choices support the target market | The product needs project-specific materials, waterproof protection, traceability, or buyer-specific testing |
| Supply plan | The module is easy to source and the project is short-term or low-volume | The product line needs stable batches, controlled BOM, repeat orders, or private configuration |
For Higintek, all these decisions can be made more concretely at the engineering level. Our linear LED modules offer a variety of beam angle options, including 30°, 60°, 90°, 120°, and 160°, as well as custom optical angles. Color capabilities also cover monochrome, dual-color, RGB, RGBW, RGBIC, and RGBCCT module designs, and support dimming options such as 0-10V, DALI, PWM, and TRIAC (where applicable). I still recommend confirming the final driver scheme, wiring method, channel control, and controller compatibility during the design phase, as not every control method is suitable for current lighting module structures.
What can be customized in an LED module?
A custom LED lighting module can be adjusted across the mechanical, optical, electrical, thermal, and production details. The most common customization items include the module size, PCB shape, LED layout, luminous flux, luminous efficacy, CRI, CCT, SDCM, beam angle, driver matching, wiring, connectors, waterproof protection and structural fit.
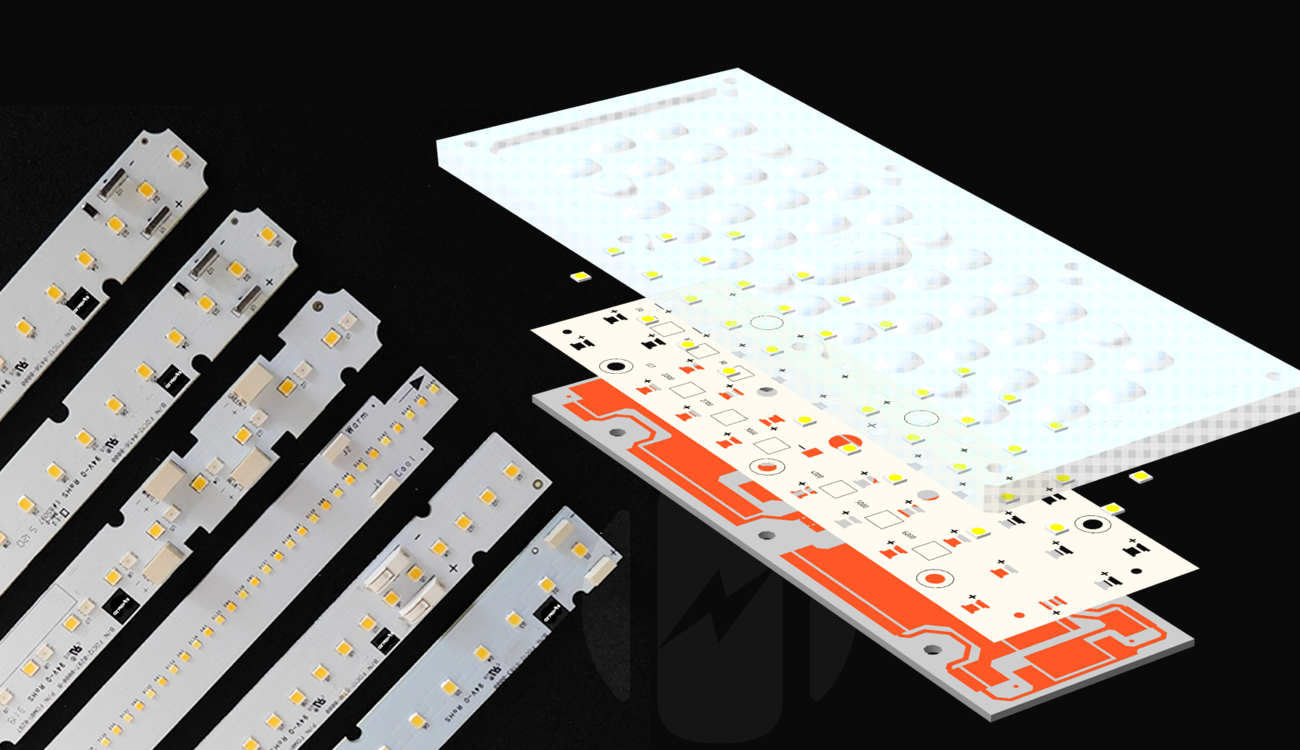
For mechanical design, the LED lighting module may need a specific PCB outline, screw-hole position, connector direction, cable exit, lens clearance or diffuser distance. This is very common in modular led light panels, linear fixtures, cabinet lights, led light modules for signs, and replacement LED module projects where a few millimeters can decide whether assembly is smooth or frustrating.
For optical design, customization may involve LED package selection, LED spacing, lens matching, diffuser matching, beam angle, light uniformity, brightness level, color temperatures, CRI, and SDCM. A high-lumen module is not automatically better. In many commercial lighting products, a cleaner beam, tighter color consistency, and better performance after the diffuser matter more than peak output on an open test bench.
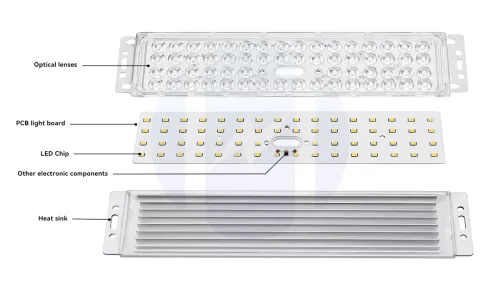
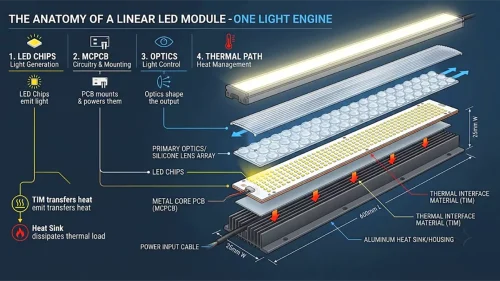
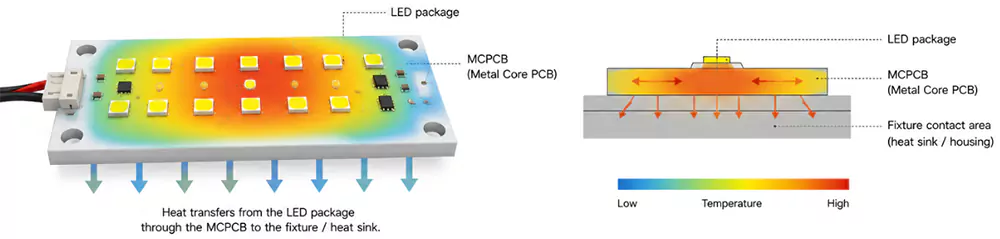
For electrical and thermal design, customization may include the constant-current design, constant-voltage design, AC LED module structure, dimming support, RGB channel control, power rating, current setting, connector type, PCB material, LED spacing, heat-transfer path, coating, and waterproof protection. This is where the “module as a system” idea matters. So we would think an LED array or module as LED packages on a PCB or substrate, possibly with optical elements and thermal, mechanical, and electrical interfaces intended to connect to a driver. And that reminds us that led module lighting performance comes from the full assembly, not the LED chip alone.

For reliability, driver and system design should not be treated as side details. A 2021 IEA 4E SSL Annex literature review noted that, as LED packages matured, other system components became weak links. One cited outdoor luminaire study found that over 70 percent of failure modes in one model, across 212 million field operation hours, were due to the driver, although the report also warns that this result should not be generalized to every LED system. That is why I would never separate custom LED module design from driver matching and thermal review.
Higntek meets the needs of customers who require end-to-end engineering support from concept review to production, rather than just an off-the-shelf product catalog. We are a technology-driven LED lighting module solutions manufacturer, supporting custom LED module development, LED PCBA and SMT assembly, BOM and component support, optical and electrical design support, sample verification, testing, and mass production. Furthermore, our professional engineering team can provide customized LED PCBA and module solutions based on project requirements, including design review, component selection, optical configuration, and sample verification.
Therefore, the real value goes beyond simply getting a sample lit. A stronger LED module manufacturer can help customers confirm whether the same optical effects, electrical performance, assembly quality, and material consistency can be mass-produced. For custom LED modules, business decisions often become clear at this point. If a project requires a stable product line rather than temporary samples, then customization is often a more secure approach to controlling performance, approvals, and repeat production.
How Does Custom LED Module Development Work?
Custom LED module development usually moves through six stages, like the requirements analysis, design, prototyping, testing and inspection, mass production and delivery. I would treat this as a controlled engineering workflow, not a simple “send drawing, make sample, place order”, because each stage can affect brightness, CCT, CRI, SDCM, driver behavior, heat control, installation fit and production consistency.
A standard led light module can often be selected from a catalog. A custom LED module needs more groundwork. Before a design can be prototyped, we must have a full understanding of the actual luminaire, application environment, optical objectives, electrical requirements, compliance pathways, and expected production volume. Higntek provides a standardized, complete process for each custom LED lighting module project, covering the entire process from requirements concept, light source selection, solution design, sample making, component procurement and PCB manufacturing, LED PCBA packaging, functional testing, LED module assembly to final delivery.
| Development stage | What should be confirmed | Why it matters |
|---|---|---|
| Requirements analysis | Application, fixture size, voltage, power, CCT, CRI, SDCM, IP need, quantity | Prevents the project from starting with missing assumptions |
| Design | PCB layout, LED spacing, driver matching, optics, thermal path, connectors | Turns the lighting target into a manufacturable LED module |
| Prototyping | Sample quantity, fixture test, diffuser or lens fit, wiring, assembly | Shows whether the module works in the final product, not only on the bench |
| Testing and inspection | Optical, electrical, thermal, functional, visual, assembly checks | Finds color drift, flicker, heat, soldering, or polarity issues before production |
| Mass production | BOM lock, SMT process, reflow, FAI, AOI, X-Ray, traceability | Keeps approved samples and production batches consistent |
| Delivery | Packaging, labeling, reports, documents, shipping arrangement | Reduces handling risk and supports buyer-side assembly or approval work |
Start with requirements analysis.
Custom LED module development usually moves through six stages, like the requirements analysis, design, prototyping, testing and inspection, mass production and delivery. I would treat this as a controlled engineering workflow, not a simple “send drawing, make sample, place order”, because each stage can affect brightness, CCT, CRI, SDCM, driver behavior, heat control, installation fit and production consistency.
Move from lighting target to module design.
The design stage turns the requirement into a buildable LED module. This includes PCB shape, hole positions, LED package selection, LED spacing, circuit layout, driver matching, lens or diffuser matching, connector selection, heat dissipation path, and so on.
Our engineers do not judge the layout of custom LED modules solely based on the neatness of the circuit board appearance. LED spacing affects uniformity. Trace width and current setting affect heat and voltage drop. PCB material affects thermal transfer. Connector direction affects assembly. Lens height affects beam angle and diffuser performance. Even a small change, such as moving the connector from the side to the back, may decide whether the module can fit into a narrow housing.
For Higntek’s ability, this is where its engineering support is relevant. This company describes the custom LED module support covering component selection, optical configuration, design review, sample verification, LED package selection, electrical design, Gerber file preparation, optical design and lens matching and power driver matching.
Build prototypes and test them inside the real fixture.
Prototyping aims to verify whether the design and manufacturing processes can maintain the effective operation of the actual lighting module.The prototype should answer practical questions. Does the module fit? Is the connector accessible? Is the beam smooth? Is the CCT still acceptable after the diffuser is added? Does the LED module lighting output meet the target at the intended current? Does the board run too hot after one or two hours? Does dimming work without flicker or uneven low-end behavior?
For repeat-order projects, one sample rarely proves enough. A small sample set gives the buyer a better chance to compare light output, color consistency, assembly fit, and thermal behavior before locking the design for production.
Use testing to catch problems before production.
Testing and inspection should cover the optical, electrical, thermal, functional, and assembly quality. For optical testing, the usual checks include luminous flux, luminous efficacy, CCT, CRI, SDCM, beam angle, and uniformity. For electrical testing, I would check voltage, current, power, driver behavior, dimming response, polarity, and protection requirements. For thermal review, the question is not only whether the module lights up, but whether heat can move away from the LED packages under real operating conditions.
Manufacturing inspection matters just as much. Higntek lists the First Article Inspection, SPI for solder paste defects, AOI for missing components or soldering defects, X-Ray inspection for internal soldering issues, ICT, visual inspection, functional testing, and 100% final product checks. These checks are not just the factory decoration. They help catch wrong parts, missing components, polarity errors, soldering defects, and functional problems before the project becomes a production run.
Lock the design before mass production.
Mass production should begin only after the sample, BOM, PCB files, optical structure, driver, test method, and acceptance criteria are confirmed. This ensures that customers will not easily change components before mass production begins.Changing an LED package, resistor value, lens, driver IC, connector, or PCB material can affect brightness, color consistency, heat, dimming or assembly quality.
The production transfer stage usually includes BOM verification, incoming material inspection, SMT placement, reflow soldering, post-assembly processing, functional testing, final inspection, and packaging. Higntek has 8 fully automated SMT lines, 25 Samsung machines, 4 advanced reflow soldering ovens, 60+ production staff, LED chip and SMD component placement, reflow soldering, connector and wiring assembly, optical lens installation, conformal coating application, and mechanical structure integration.
Finish with delivery, documentation, and production records.
Delivery is more than shipping boxes. For a custom LED module project, the buyer may need labels, anti-static packaging, moisture-proof or shock-resistant protection, inspection records, specification sheets, packing details, and traceability information. Higntek states that packaging can include ESD-safe materials, moisture-proof and shock-resistant protection, customized packaging, clear labeling, and traceability support.
We firmly adhere to one principle: the development process of LED lighting modules does not end when the sample lights up. A cooperative order is only considered complete when the approved LED lighting modules can be produced, inspected, packaged, delivered, and provided with long-term after-sales support at the same agreed-upon performance.
What Factors Affect Custom LED Module Cost?
Custom LED module cost is mainly affected by LED brand and model, driver design, PCB material and process, lens or diffuser requirements, supporting components, and production quantity. I would not treat a custom led light module as a fixed-price catalog part. Once the module needs a specific size, CCT, CRI, SDCM, driver, optical effect, waterproof structure, or production standard, the quote naturally changes with the design.
DOE’s LED manufacturing supply-chain report gives us a helpful reference. In a typical LED troffer example, cost is split across structure or housing, driver, LED light engine, overhead, assembly, and optics. The LED light engine itself includes LED packages and PCB. The exact numbers do not equal a custom LED module quote, but the logic is useful. LED packages are only one part of the total cost. Driver, PCB, optics, assembly, and testing also shape the final price.
| Cost factor | What may raise the quote | What I would check |
|---|---|---|
| LED brand and model | Higher efficacy, CRI 90/95+, 3-step SDCM, special wavelength, branded chips | LED part number, CCT, CRI, SDCM, lumen target, stock status |
| Driver and electrical design | Dimming, AC LED module, RGB control, current accuracy, safety margin | Voltage, current, wattage, dimming method, driver compatibility |
| PCB material and process | Aluminum or copper substrate, thicker copper, special shape, tighter tolerance | Heat load, board thickness, hole position, surface finish, Gerber control |
| Lens and diffuser | Custom lens, diffuser matching, beam control, anti-glare design, optical testing | Beam angle, uniformity, light loss, tooling need, final fixture test |
| Other components | Connectors, wires, coating, waterproof parts, labels, packaging | Availability, certification need, assembly method, replacement risk |
| Production scale | Prototype setup, small batch, high-mix SKUs, extra inspection | Sample quantity, annual forecast, repeat order plan, test standard |
Specification choices change the quote first.
The fastest way to change the cost is to change the specification. A 3000K CRI 80 5-step SDCM module and a 4000K CRI 90 3-step SDCM module may both sound like ordinary white LED module lights, but they are not the same buying task. The second one needs tighter LED selection, stronger color control, and more careful batch management. That affects sourcing, testing, and production consistency.
The same logic applies to special module types. A simple fixed-voltage led lights module is usually easier to quote than an AC LED module, an RGB LED module with multi-channel control, or an infrared LED light module with a defined wavelength. These projects need clearer electrical design, driver matching, and testing. I would rather see those details written in the quote than get a low price that only says that LED module included.
Materials and optics decide whether the cost is reasonable.
PCB material is one of the clearest cost differences. FR4 may work for lower-power modules. Aluminum PCB is often used when heat dissipation matters more. Copper substrate can be considered for higher heat density, but it usually raises cost. Board thickness, copper thickness, surface finish, irregular outline, hole tolerance, and panel utilization can also change the final price.
Optics are similar. A standard diffuser or wide beam is usually simpler. A custom lens, low-glare optic, private diffuser structure, or strict uniformity target adds design and testing work. For modular led light panels or long linear lighting, this can be worth the added cost because poor optical control creates visible hot spots, dark zones, or uneven rows that are difficult to fix after installation.
Supporting parts also deserve our attention. Connectors, wires, thermal interface materials, conformal coating, waterproof parts, labels, packaging, and documentation may look minor, but they affect assembly, compliance, maintenance, and repeat orders. A LED module waterproof project may need sealed connectors and coating. A replacement LED module may need the same mounting pattern and connector direction as the old part. These details are part of the real cost, not optional decoration.
Quantity changes how the cost is spread.
A sample order, pilot run, and repeat production order should not be compared as if they were the same. A five-piece sample run spreads engineering review, material preparation, SMT setup, testing, and communication over very few units. A larger repeat order spreads fixed work across more modules and gives the supplier more room to plan LED packages, PCB panels, connectors, packaging, and inspection flow.
So the cleanest way for us to compare custom LED module cost is to check what the price actually covers. A useful quote should make the LED package, driver requirement, PCB material, optics, supporting parts, testing scope, sample stage, and production quantity clear. Once those details are visible, the buyer can compare real project value instead of chasing the lowest number.
Mass production should begin only after the sample, BOM, PCB files, optical structure, driver, test method, and acceptance criteria are confirmed. I would be careful with last-minute component substitutions at this stage. Changing an LED package, resistor value, lens, driver IC, connector, or PCB material can affect brightness, color consistency, heat, dimming or assembly quality.
The production transfer stage usually includes BOM verification, incoming material inspection, SMT placement, reflow soldering, post-assembly processing, functional testing, final inspection, and packaging. Higntek has 8 fully automated SMT lines, 25 Samsung machines, 4 advanced reflow soldering ovens, 60+ production staff, LED chip and SMD component placement, reflow soldering, connector and wiring assembly, optical lens installation, conformal coating application, and mechanical structure integration.
At this stage, we will also re-verify that the BOM can reproduce the approved samples. A good prototype is helpful, but what buyers really need is stable, repeatable production.
What specifications should you check before choosing an LED module?
Check application, size, voltage, current, power, lumen output, lm/W, CCT, CRI, SDCM, beam angle, driver type, PCB material, IP rating, connector, mounting method and certification needs.
What are common mistakes when selecting LED modules?
The common mistakes are choosing by the brightness alone, ignoring driver compatibility, testing outside the final fixture, and treating CCT, CRI, or SDCM as minor details. A bright module can still create glare, dark zones, color mismatch, flicker, or heat problems after it is installed with the real lens, diffuser, housing, and driver.
Another mistake is comparing prices without checking the specification behind the quote. LED package, PCB material, driver, testing scope, and packaging can all change the real cost.
How long does it take to develop a custom LED module?
The timeline depends on design complexity, component availability, PCB development, optical testing, sample feedback, and production quantity. A simple modification may move faster, while a new custom LED module with special size, optics, driver matching, waterproof protection, or tight color control needs more verification.
For Higntek, it lists a standard production lead time of 10-20 days, with 2-7 days fast delivery when components are stocked or reserved. This should be read as production lead time under suitable material conditions, not just a fixed timeline for every new custom project.
Why do LED module prices vary so much?
LED module prices vary because the quote depends on the LED package, CRI, SDCM, driver design, PCB material, optics, connectors, coating, waterproof parts, testing scope, and order quantity. For example, two modules may both be 4000K, but one may use CRI 80 and 5-step SDCM, while another uses CRI 90 and 3-step SDCM. They are not the same cost structure.
What testing is required before shipment?
Before shipment, LED modules should be checked for optical, electrical, functional, visual, and assembly quality. Common checks often include the luminous flux, efficacy, CCT, CRI, SDCM, beam uniformity, voltage, current, power, polarity, dimming behavior, soldering quality, component placement, and final lighting performance.
For Higntek’s capability, relevant checks include the IQC, SPI, AOI, X-Ray inspection, ICT, visual inspection, functional testing, and final product checks. These steps help reduce defects before custom LED modules move into shipment or repeat orders.
Need Help Choosing the Right LED Lighting Module?
Not sure whether a standard or custom LED module is the better choice? Share your project requirements with our engineering team, and we’ll recommend the most practical solution based on your application, performance targets, and budget.


